Lego Carcassonne
By Cal Henderson, March 6th 2011.
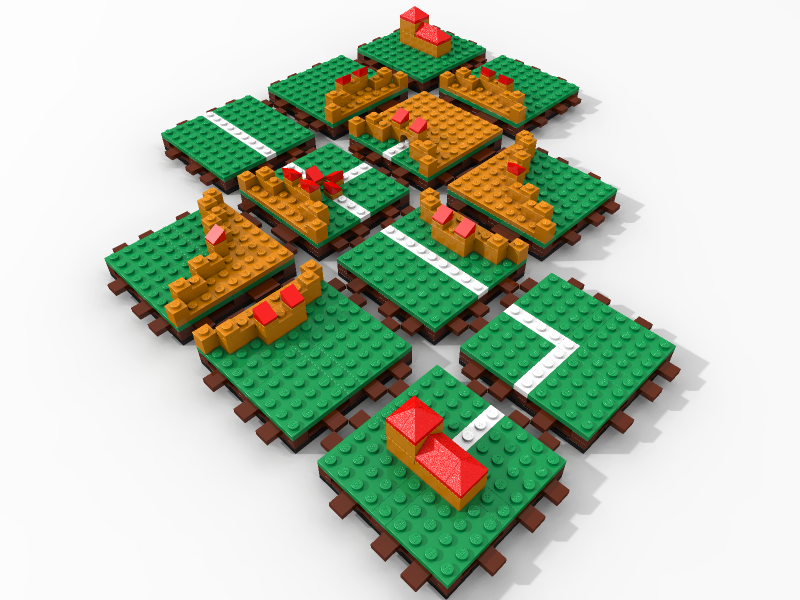
After seeing the Lego Catan doing the rounds a couple of weeks ago, I thought I'd like to have a go at something similar. I've been playing a lot of Carcassonne on the iPhone recently (Hit me up for a game, I'm really bad: cal at iamcal.com) so that was the natural choice. The tiles are square, so that immediately made it much simpler.

I started out by downloading SR 3D Builder. I had played around with the LDraw tools a few years ago and they were pretty difficult to do anything useful with. While SR 3D is hardly intuitive, after a couple of hours of struggling with the sparse ESL documentation, I was able to start building. Since the road tiles have a centered road, I wanted an odd sized tile. I went with 9x9, since that gives me a good 4x4 area to play with for each corner. I created a black tile base to start with.

I wanted to make a playable set, where the pieces interlocked with each other. Since there are 3 unique sides in the game (field, road and city), I went with 3 different interlocks which would mean that only like-sides can be joined together. Since each tile is 9 units on a side and I can't use the center square (because it has to lie flat against its opposing tile) or the corner squares (they get tricky because they are shared by 2 edges), I had two groups of 3 squares to play with. Each of those 3 can be a peg or a hole, but the 2nd set of three needs to be a mirror of the first so it'll interlock. This gives 8 different possible combinations (or 27 if you allow leaving squares flat too), which is more than enough. I picked 3 simple patterns and built them onto the base plate in brown.


Once I'd created the edges, it was a simple matter of cloning the right edge pieces onto the base to construct each tile. The content of the tile then sits on top, using green for the fields, white for roads and tan/red for cities and cloisters.
By far the most time went into rendering the designed images. Turning the L3B designs (which are a simple text format that you can easily edit by hand) into pretty images can be done using POV-Ray, an open-source ray tracer. POV-Ray also uses a simple text language for input, known as POV files. To turn L3B files into POV files, you need L3P and L3PAO. Luckily, SR 3D installs the L3Draw toolkit, which includes both of these tools (and a bunch more), probably in C:\LDraw\.
L3PAO creates POV files, using the LDraw block data files. It can also use LGEO, another block data library which contains better block data for rendering. The LDraw tools already have LGEO, but I used the latest version for better results. Once you've generated the POV files, you can run a quick test render - it won't look great, but you can see your model.
I followed an old tutorial which covers importing a new color system and setting up better lighting.
For much improved radiosity lighting, you'll want to use MegaPOV. The latest version of MegaPOV (1.2.1) will not work with the latest version of POV-Ray (3.6.2), Once I downgraded to POV-Ray 3.6.1, it all worked fine.
I was unable to find the HDR lightprobes mentioned in the tutorial, but I located these alternatives. You need to drop the .hdr files into your POV-Ray/include folder for them to work. I couldn't get good results using them, but I'd love to hear tips.
Using a white sky sphere and a circular area light I was able to get some pretty good results, but there were a large number of specular defects (white and black single pixels) at the gaps between bricks. Anti aliasing fixes this, so rendering at twice the needed resolution and then down-sampling using a bicubic filter (Photoshop or PaintShopPro will do this) works great.
If you find the brick colors too shiny, you can manually change the color values. Black is color 0, so search in koyancolours.inc for the Color0 block and you'll see it points to lg_color_N06.inc. This file contains the texture definition, as described here. Play around with the textures until you get the look you want.
The source files for my tiles are on GitHub if you'd like to play with them or build on them. I have a few ideas for the meeples (the little dudes used as game pieces in Carcassonne) and for some of the game expansions. Using Lego Design-by-me, I should be able to order the full game at some point.
Update, March 6th, 4pm PST: I created a single tile in Lego's Digital Designer. The source file is available in the GitHub repo. The crossroads tile is priced at around $25, which would put the full 72-tiles game at around $2000 (the city tiles use a few more piece than the road ones). Ouch! Any ideas how you could build the set cheaper?
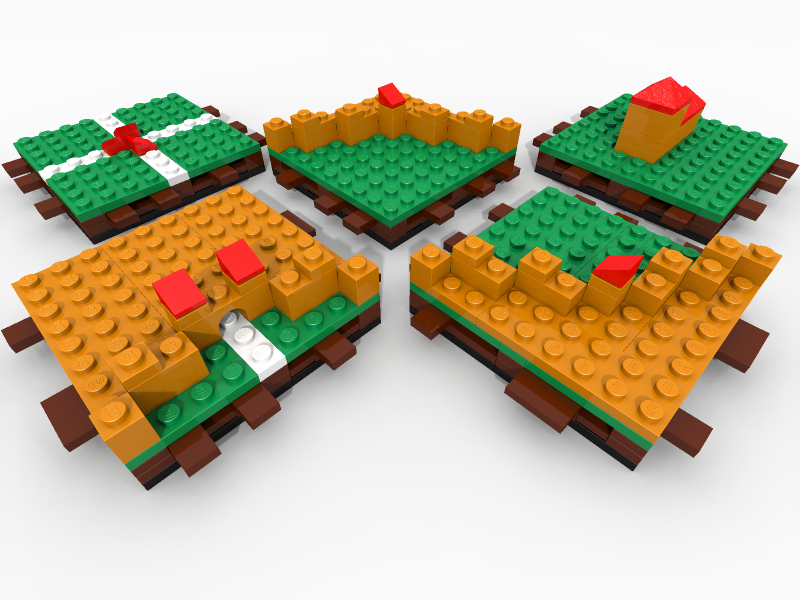
Update, March 7th: Based on a design by FredWallace in the comments, I've put together a smaller, simpler set of 7x7 tiles. They lack the interconnects, but they have an interesting layered look:
This set should be a lot cheaper to make. I also used the tan color (LDraw color 19), rather than dark tan in the original set. Not only does it look better, but these pieces also exist!

This scale makes it quite easy to make a nice little shield motif too. Might be a bit small to use minifigs as meeple though.

Post-Script
I love lego, board games and computers, but there's a billion things I don't know. If you spot any glaring mistakes or omissions, leave a comment or drop me an email and teach me: cal [at] iamcal.com
If anyone can figure out how to use groups in SR 3D, please let me know. I'm considering writing a simple tutorial on using it in general, since it was such a pain to get up and running. Let me know if that interests you.
The source code for the models can be found here on GitHub.
Copyright © 2011 Cal Henderson.
The text of this article is all rights reserved. No part of these publications shall be reproduced, stored in a retrieval system, or transmitted by any means - electronic, mechanical, photocopying, recording or otherwise - without written permission from the publisher, except for the inclusion of brief quotations in a review or academic work.
All source code in this article is licensed under a Creative Commons Attribution-ShareAlike 3.0 License. That means you can copy it and use it (even commerically), but you can't sell it and you must use attribution.
55 people have commented

The thing I hate most when playing Catan, and Carcassonne to a lesser extent, is the way the tiles split apart during play. These should hold together nicely at the expense of easy placement for some configurations.


if you don;t know the people who can help you make it work i can hook you up :D


great work with SR3D. If you want more information about using groups, please email me.
Sergio (author of SR3DBuilder)


Love the design, and the idea (as both a fan of Lego and Carcassonne).
I wonder how big this set would end up being though? 9x9 is a fair bit bigger than the actual Carcassonne tiles (I don't know if you've got the physical set?).
I'd suggest trying to scale it down to 7x7 or even 5x5, to make it cheaper and more playable.
In terms of the interlock, if you were willing to sacrifice the the only-matching-sides-can-go-together feature, you could use a basic tongue-and-groove solution which might still hold the tiles together, and make it easier to slot pieces in (apart from where you have a completely surrounded hole, which would require taking-apart again).
Frankie

Nice article! I made the Lego Catan you linked.
It sounds like you had a pretty similar experience getting going with LDraw, SR3D, and POV-Ray as I did. I wanted to design a Lego version of Catan, but I also wanted to be able to see the design as close to what it might actually look like if I was to build it. It is quite the process from start to finish. And in the end, I also have considered writing a more detailed tutorial for SR3D, as well as possibly expanding on the POV-Ray side of things (I followed the same tutorial as you did for the rendering).
I am actually in the process of buying all the bricks to make the Catan board. I have been using bricklink ( <a href="http://www.bricklink.com/">www.bricklink.com</a> ) which a few people have already suggested. This route is a bit more effort and will usually require several separate purchases in order to get all the parts you need for one build. But, it is much cheaper than buying directly from LEGO, so it's worth it.
I'm glad my creation inspired you!
I recently made a 48x48 LEGO mosaic. To have designed via the LEGO website or via the Designer would have cost me over $250. By using Bricklink I was able to make it for $80.
As you would be buying a lot of the same piece you would probably get a cheaper rate from some of the stores.
Also look into buying smooth tiles for the surface as they can sometimes be cheaper as well as more common colours for the interconnects.
Tuxedo Mask: Yes. I spoke about that in the 2nd comment, above.
Frankie Roberto: Scaling it down would make it cheaper for sure. For connecting, you'd still need at least a 2-part system for all tiles to fit together. At 5x5 you wouldn't have space for 3 different edges either, unless one was completely flat or used the corners. Since there's no L shaped tile pieces, that might be impossible.
Michael Thomas: Thanks so much for making the Catan pictures public. Bricklink might be the way to go to get a full sized set.
I could also build without the bottom 2 layers or the connector edges to cut down on pieces needed, at least initially (so just the green top and a single brown layer to hold it together).
I've done some experiments with meeples, but nothing that looks really good yet. To get the sheilds perfect I'd need to hand-paint them; there's gray and red in the right patten, or a dragon design in the right colors, but not both together.
Also, how do you actually play 3D Carcassonne? Would you have to play with the cardboard set, draw your tile, then match it to the Lego version?


I tried 6*6 and I don't think it's possible without making terrible sacrifices (roads that don't line up since they;re not centered), and I think 5*5 would be too small for some of the many-featured pieces.
My 7*7 design relies on 8 2x3 pieces in a, well, swastika. Another layer of this, flipped, would make a strong base with a hole in the middle. I would then allow other parts to be up to one brick thick (1 plate for roads and field, up to 3 for cities and cloisters). This makes a less pretty, but maybe more-playable design.
Click my link for a tentative layout of pieces (shown in the same order as on the wikipedia page).
FredWallace: I think 7x7 can work and your tiles look sensible. I used a different pattern at make 7x7 layers (the top layer is rotated 90 degrees): <a href="http://www.iamcal.com/images/7x7.png">www.iamcal.com/images/7x7.png</a>


My first instinct when seeing the tile size was that the cost per tile was going to be pricey. This is an instinct well honed over the years as the Buffington household collection is now large enough to require a dedicated room.
I designed a few tiles based on a 4x4 foot print - these would cost less primarily because of the smaller size, but also because of the reduced complexity.
Here's a screenshot from Lego Digital Designer in "Universe" mode (which let's you use every Lego brick/color ever made instead of just the brick available from the "Design by me" catalog).
<a href="http://dl.dropbox.com/u/100876/Screenshots/lego_carcassone_4x4.png">dl.dropbox.com/u/100876/Screenshots/lego_carcassone_4x4.png</a>
I think the 4x4 format could work. Making the plates interlock is a bit much I think. With a few large base plates and some 1 stud plates on the corners of the 4x4 tiles you'd have a solid, shift-free game.
Also, ordering from Bricklink is the way to go. I've made several dozen purchases from other hobbyists and have always been satisfied. Even when buying used bricks the quality is typically pretty high on all levels. I highly recommend spending $50 somewhere just to see how the experience differs from retail.
In any case, I think I'll continue working on my 4x4 tiles and seeing what a full set would cost if sourced on Bricklink.

I believe that moving down to a 7x7 would be viable and help a lot with the costs. And you would still be able to have the roads in the center. I can't wait to see what comes out of this. Thanks for sharing!

<a href="http://www.iamcal.com/articles/assets/3x3_800.png">www.iamcal.com/articles/assets/3x3_800.png</a>


<a href="http://i.imgur.com/JBEbu.png">i.imgur.com/JBEbu.png</a>
Yes, I made this in paint. I've used LDraw, but that seemed harder to me for this. Maybe I'll look into SR 3D Builder for future projects.
I'm excited about it, but I don't have the money to drop this instant. Now that I've made the plans though, it should be easy to come back to.
Anyone else can of course feel free to take my plans and build it themselves (I'd appreciate seeing the final product).
This can easily be condensed to 4 layers by not having height on the cities or cloisters and insetting the shields. It could be further condensed to only 3 layers by having the river and field/road be the same layer. 2 layers is improbable.


- if you really want to get this design out to people, post it to LEGO's new CUUSOO site where, with enough public support, it will be made into an official LEGO set.
- Meeples for the 7x7 tiles could be done using the new LEGO games microfigs. They are 1x1 and come in a variety of colors.
Really nice work on the renders.
-Suz (designer of the first LEGO Catan set, some years ago)

<a href="http://lego.cuusoo.com/">lego.cuusoo.com</a>
<a href="http://lego.wikia.com/wiki/Microfigure">lego.wikia.com/wiki/Microfigure</a>
<a href="mailto:|@|";>|@|<;/a> _
| | versus |=|
You could use a grid under the tiles, not a huge board but a grid to make removing the pieces easier.

<a href="http://quaran.to/blog/2014/01/06/5x5-lego-carcassone/">quaran.to/blog/2014/01/06/5x5-lego-carcassone</a>

Leave your own comment
Comments have been disabled
# March 6, 2011 - 11:00 pm PST