I like designing fonts. I like designing pixel fonts. I don't like how difficult it is to get them to work. For this reason, i've written a short guide to creating cross platform pixel fonts.
My favourite font making tool is "Font Creator Program" for Windows, made by High-Logic (It only costs $50 and is well worth it). All the instructions here are for FCP, not Fontographer.
Update: There are some Fontographer specific instructions here - you'll want to read everything else first though.
We'll start with some maths first. Fonts are designed in the abstract "FUnit" measurement. FUnits make up the also abstract "Em-Square". The number of FUnits in an Em-Square is a value you choose when creating a font. The Em-Square is supposed to represent a single character (roughly). Adobe, Apple and Microsoft all use an Em-Square of 2048 FUnits. This is noticably a power of 2 (2^11 = 2048). It doesn't have to be a power of 2, but rendering times are improved if it is. So what use are FUnits and the Em-Square? Well, they're used when rasterizing the font (the process of turning vectors into pixels). There's a formula for converting FUnits into Pixels:
Size in pixels = (Size in FUnits * Point Size * Target DPI) / (72 * FUnits per Em-Square)
Easy right? Not so fast. Windows, and MacOS use a different screen dpi - windows uses 96 while macos uses 72. Flash also uses 72, whatever platform it's on (we would like our fonts to work in flash). Luckily there are some numbers we can plug in to the formula to come up with a font that works pixel-perfect at both dpi's.
We'll assume we'll use 2048 FUnits per Em-Square. We know the target dpi's (72 and 96) and we can pick some point sizes out of thin air. We know we want "Size in pixels" to be 1 - what we're looking for here is the number of FUnits we need to make each "pixel" in our font. A bit of trial and error reveals that if you use point size 6 at 96 dpi it's the same as point size 8 at 72 dpi (96*6 = 72*8). We can plug all these numbers into our formula now:
1 = (Size in FUnits * 8 * 72) / (72 * 2048)
Size in FUnits = 256
So each "pixel" block in our font needs to measure 256 FUnits on each side. Now we have some values, we can start building our font. Fire up FCP and create a new font. Head straight to the "Format -> Settings" menu to input some values.
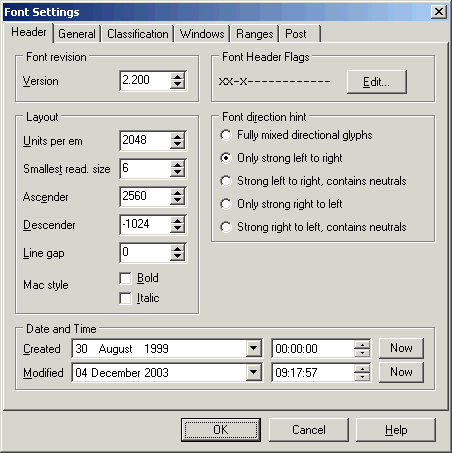
We care about the "layout" panel on this tab. Make sure "Units per em" is set to 2048 as we discussed above. "Smallest read. size" can be ignored for now. "Ascender" is the height of your tallest character above the baseline. If your tallest character was 5 pixels high, then enter 1280 in this box (5 * 256). "Descender" is the height of the space below the baseline reserved for descenders. I also like to add line spacing here. If your font doesn't have descenders, just use this for line spacing. This to number of pixels you need * 256 * -1. For instance, for a descender of 1 pixel and a line gap of 3, you should enter -1024 ((1 + 3) * 256 * -1). Set "Line gap" to 0.
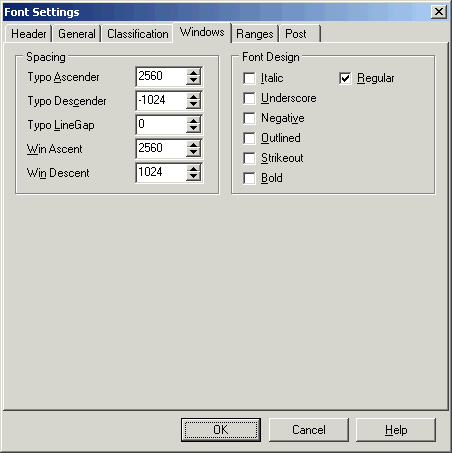
Now onto the "Windows" Tab. The settings you use here are the same as on the "Header" tab. "Typo Ascender" should match "Ascender" and "Typo Descender" should match "Descender". Set "Typo LineGap" to 0. "Win Ascent" should match "Ascender" too, and "Win Descent" should be the negative of "Descender" (and thus a positive value).
If your font is bold or italic, you'll want to set those flags too - have a look though each tab and see if there's anything else you need to set - just remember to use multiples of 256 in any measurments, else you'll end up with things off-pixel (which means flash will antialias them). Click OK to save the settings.
Next you need to disable antialiasing for the font, or "Grayscaling" in Turetype speak. Choose "Format -> Grayscale" from the menu.
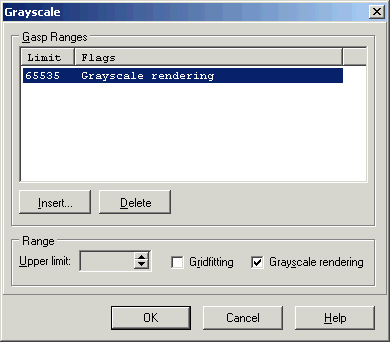
By default, all sizes up to 65535 points will use "Grayscale Rendering" which is not what we want. Don't delete this entry (that indicates the renderer should do what it thinks best), but uncheck the "Greayscale Rendering" checkbox. Click OK to save the settings.
Now we're finally ready to make some fonts - rock! Double click on one of the character boxes to bring up the editor. It looks a bit like this:
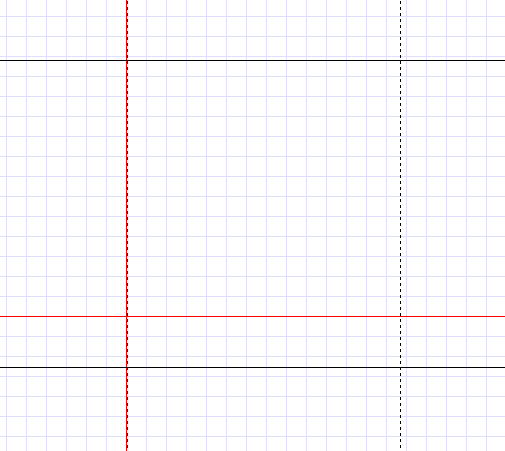
The dotted lines are the bearings (LSB = left side bearing, RSB = right side bearing). The solid veritcal line (under the LSB when you start) is the origin. Don't make any part of your character go left of the origin. The top horizontal line is the ascender limit - your character needs to go below here. The red horizontal line is the baseline - normal characters without descenders don't go below here (infact, they should sit on this line). The bottom horizontal line is the descender line (including our line spacing if you recall). Each character needs to include some space around it, so that it doesn't touch the next character. If you want simple spacing, then just leave 1 or two pixels worth of space after the character before the RSB.
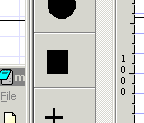
Let's create a simple character to demonstrate. Drag the square from the palette on the left onto the grid and change into point editing mode.
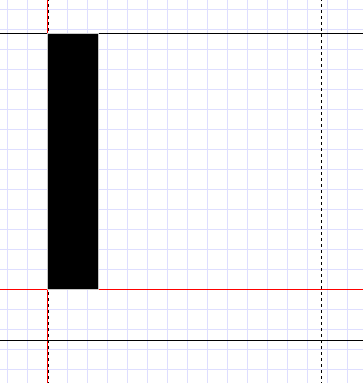
Using the transform window, we're going to position the four points of the contour individually. Set them to (0,0), (256,0), (256,1280) and (0,1280). This should give us a simple 'l' shape and should look like this:
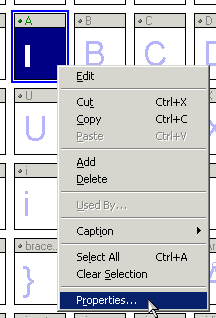
If we want to have 2 pixels space after the character, then the RSB needs to be at 768 FUnits. You can drag the dotted line, but we want to be more exact, so close down the glyph and return to the character preview. Right click on your new character and choose "Properties".
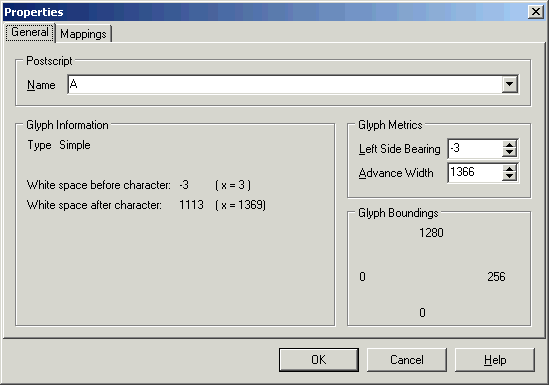
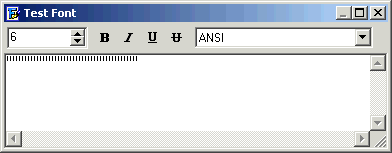
Set the left side bearing to 0. The Advance Width is the distance between the LSB and the RSB. Since our LSB is zero, set the Advance Width to 768. It should now say there's no whitespace before the characters and 512 whitespace after it (2 pixels worth). Click on the font preview button, and type in your character (type lots of lowercase 'a's if yuo've been editing the 'a' character). It should show your newly created vertical line (make sure the size is set to 6):

Well done! You've created your first pixel font. It's not quite over yet though ;)
Choose "Format -> Naming" from the menu. You'll need set set all the details for "Microsoft Unicode / English - United States" and "Macintosh Roman - English". It's worth clicking the "Advanced..." button as it allows you to add a url to your foundry's website.
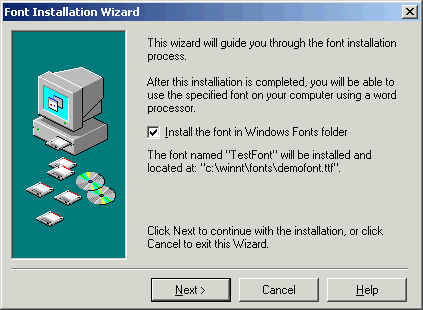
Once you've named your font, you can install it. If you've already installed it, shutdown any open applications (except FCP!), go into your windows font folder (e.g. C:\WinNT\Fonts) and delete the font file. Now click on the install button in FCP and go through the dialog.

Now launch an app that uses fonts (eg. word) and your font should be in the list. Give it a go. Woo, it works!
You're ready for part two.
15 people have commented


I need to create a font for writing very tall bar-codes in windows. (Like 5500-6000 high in the metrics tab.) I couldn't find any existing. Is this possible to do?
Different renders stop working at different huge metrics, so you'd want to test on native windows apps, native mac apps and flash at the least.

We have 2 to be constructed from scan. They will have to be redrawn from the scan. Do we have them redrawn?
Please let me know
Thanks
Sandra / papergrafix toronto


Great article. I found it really useful when I was converting an old Amiga bitmap font to TTF. There is, however, a small error in your tutorial. In the beggining you write:
"A bit of trial and error reveals that if you use point size 8 at 96 dpi it's the same as point size 6 at 72 dpi (96*6 = 72*8)."
While the formula is correct, the explanation is not. It should read as follows:
"A bit of trial and error reveals that if you use point size 6 at 96 dpi it's the same as point size 8 at 72 dpi (96*6 = 72*8)."
Small thing, but it may confuse people :)
My resulting work: <a href="http://ptless.org/sfomi.html">ptless.org/sfomi.html</a>


thanks for the article,how many pixels can fit into an A4 paper?
Leave your own comment
Comments have been disabled
# October 25, 2009 - 10:42 pm PST